How to Integrate Google Maps and Apple Maps in iOS?
Since 2005, when Google presented its first web mapping service to the public, maps have evolved drastically. Today, mapping services are present in almost all kinds of applications. In this article, we’ll tell you how to integrate Google Maps and Apple Maps into an iOS app.
How to integrate Google Maps in iOS
Before you begin working with Google Maps on iOS, you need to download the Google Maps SDK for iOS and get an API key.
1. Download the Google Maps SDK or install pods in your project
1.1 To install pods, open your pod file and add the following lines:
pod 'GoogleMaps'
pod ‘GooglePlaces'
Premium Plan customers must also add:
pod ‘GoogleMaps/M4B'
2. Get an API key:
2.1 Go to the Google API Console.
2.2 Create or select a project.
2.3 Click Continue to enable the Google Maps SDK for iOS.
2.4 On the Credentials page, get an API key.
2.5 Note: If you have a key with iOS restrictions, you may use that key. You can use the same key with any of your iOS applications within the same project.
2.6 From the dialog box displaying the API key, select Restrict key to set an iOS restriction on the API key.
2.7 In the Restrictions section, select iOS apps, then enter your app’s bundle identifier. For example, com.example.hellomap.
2.8 Click Save. Your new iOS-restricted API key will appear in the list of API keys for your project. The API key is a string of characters like this:
AIzaSyBdVl-cTICSwYKrZ95SuvNw7dbMuDt1KG0
3. Add your API key to AppDelegate.swift as follows:
3.1 Add the following import statement:
import GoogleMaps
3.2 Add the following to your application(_:didFinishLaunchingWithOptions:) method, replacing YOUR_API_KEY with your API key:
GMSServices.provideAPIKey("YOUR_API_KEY")
3.3 If you’re also using the Places API, add your key again as shown here:
GMSPlacesClient.provideAPIKey(“YOUR_API_KEY”)
4. Add a map
class YourViewController: UIViewController {

  // You don't need to modify the default init(nibName:bundle:) method.

  override func loadView() {
    // Create a GMSCameraPosition that tells the map to display the
    // coordinate -33.86,151.20 at zoom level 6.
    let camera = GMSCameraPosition.camera(withLatitude: -33.86, longitude: 151.20, zoom: 6.0)
    let mapView = GMSMapView.map(withFrame: CGRect.zero, camera: camera)
    view = mapView


  }
}
5. Declare the URL schemes used by the API
Beginning with iOS 9 and Xcode 7, apps must declare the URL schemes that they intend to open in the app’s Info.plist file.
To declare the URL schemes used by the Google Maps SDK for iOS, add the following lines to Info.plist:
<key>LSApplicationQueriesSchemes</key>
<array>
<string>googlechromes</string>
<string>comgooglemaps</string>
</array>
6. Add a marker to the map
6.1 Create a map and set it as the view in loadView().
// Create a GMSCameraPosition that tells the map to display the
		// coordinate -33.86,151.20 at zoom level 6.
	let camera = GMSCameraPosition.camera(withLatitude: -33.86, longitude: 151.20, zoom: 6.0)
		let mapView = GMSMapView.map(withFrame: CGRect.zero, camera: camera)
		view = mapView
6.2 Add a marker to the map in loadView().
// Creates a marker in the center of the map.
			let marker = GMSMarker()
	marker.position = CLLocationCoordinate2D(latitude: -33.86, longitude: 151.20)

		marker.map = mapView
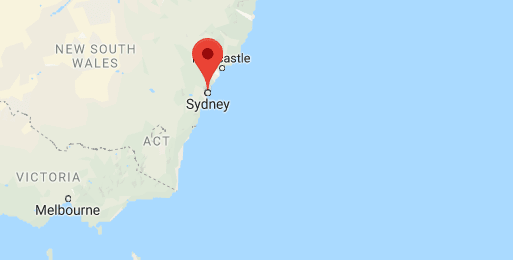
6.3 By default, the Google Maps SDK for iOS displays the content of the info window when the user taps a marker. There’s no need to add a click listener for the marker if you’re happy with the default behavior.
6.4 To add a custom marker with your own image, add the following code:
let markerView = UIImageView(image: “YOUR_IMAGE_NAME”)
              markerView.tintColor = UIColor.red
	   marker.iconView = markerView

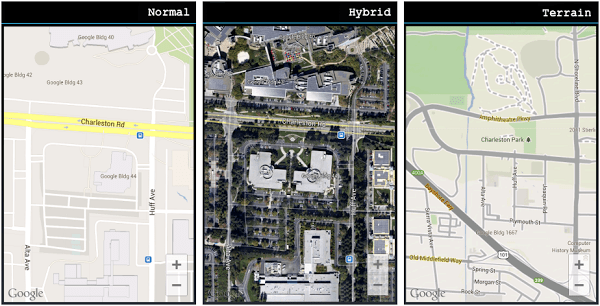
7. Map types
You can customize your map with one of several map types. A map’s type governs how the map looks and what it shows. For example, political maps
such as those found in a traditional atlas show boundaries of states, counties, cities, and other political entities, while road maps show all of the roads in a city or region. The Google Maps SDK for iOS offers the following types of maps:
1. Normal – A typical road map showing roads, some prominent structures, and important natural features like rivers. Road and feature labels are also visible. This is the default map mode in Google Maps.
2. Hybrid – Satellite photography with road maps superimposed, along with road and feature labels. A hybrid map can be enabled in Google Maps for iOS by turning on the Satellite view.
3. Satellite – Pure satellite photography without road and feature labels. This mode is not available in Google Maps for iOS.
4. Terrain – A topographic map including colors of areas, contour lines and labels, and perspective shading. Some roads and labels are also visible.
5. None – No map tiles (the base map tiles will not be rendered). This mode is useful in conjunction with tile layers. Traffic data display is disabled when the map type is set to none.
8. Map styling
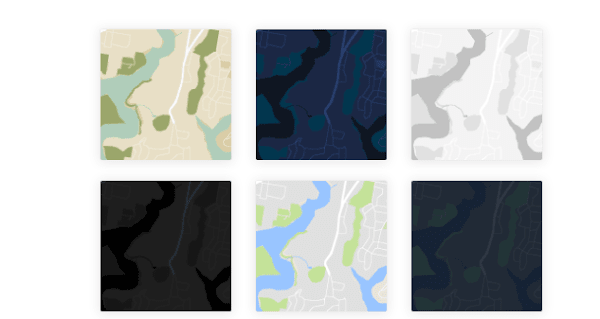
With style options, you can customize the presentation of Google Maps, changing the look of features like roads, parks, businesses, and other points of interest. This means that you can emphasize particular map components or make the map complement your app’s style.
Styling works only on the kGMSTypeNormal map type.
1. To apply a custom map style to a map, call GMSMapStyle(…) to create a GMSMapStyle instance, passing in the URL for a local JSON file or a JSON string containing style definitions. Assign the GMSMapStyle instance to the mapStyle property of the map.
2. The following code sample assumes your project contains a file named style.json:
import UIKit
import GoogleMaps

class ViewController: UIViewController {

  // Set the status bar style to complement night mode.
  override var preferredStatusBarStyle: UIStatusBarStyle {
    return .lightContent
  }

  override func loadView() {
    let camera = GMSCameraPosition.camera(withLatitude: -33.86, longitude: 151.20, zoom: 14.0)
    let mapView = GMSMapView.map(withFrame: CGRect.zero, camera: camera)

    do {
      // Set the map style by passing the URL of the local file.
      if let styleURL = Bundle.main.url(forResource: "style", withExtension: "json") {
        mapView.mapStyle = try GMSMapStyle(contentsOfFileURL: styleURL)
      } else {
        NSLog("Unable to find style.json")
      }
    } catch {
      NSLog("One or more of the map styles failed to load. (error)")
    }

    self.view = mapView
  }
}
3. The following examples call GMSMapStyle(…) and pass a string resource:
import UIKit
import GoogleMaps

let kMapStyle = "[" +
"  {" +
"    "featureType": "poi.business"," +
"    "elementType": "all"," +
"    "stylers": [" +
"      {" +
"        "visibility": "off"" +
"      }" +
"    ]" +
"  }," +
"  {" +
"    "featureType": "transit"," +
"    "elementType": "labels.icon"," +
"    "stylers": [" +
"      {" +
"        "visibility": "off"" +
"      }" +
"    ]" +
"  }" +
"]"
class ViewController: UIViewController {

  // Set the status bar style to complement night mode.
  override var preferredStatusBarStyle: UIStatusBarStyle {
    return .lightContent
  }

  override func loadView() {
    let camera = GMSCameraPosition.camera(withLatitude: -33.86, longitude: 151.20, zoom: 14.0)
    let mapView = GMSMapView.map(withFrame: CGRect.zero, camera: camera)

    do {
      // Set the map style by passing a valid JSON string.
      mapView.mapStyle = try GMSMapStyle(jsonString: kMapStyle)
    } catch {
      NSLog("One or more of the map styles failed to load. (error)")
    }

    self.view = mapView
  }
}
9. Street View
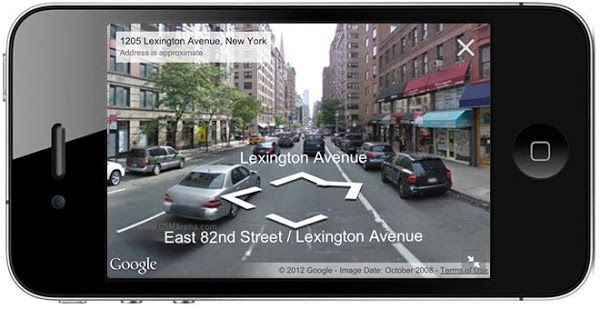
Google Maps Street View lets you explore places around the world through 360-degree, street-level imagery. You can explore world landmarks, view natural wonders, take a virtual trip, or show the outside of your business.
The example below adds a Street View viewer to an app:
import UIKit
import GoogleMaps

class ViewController: UIViewController, GMSMapViewDelegate {

  override func loadView() {
    let panoView = GMSPanoramaView(frame: .zero)
    self.view = panoView

    panoView.moveNearCoordinate(CLLocationCoordinate2D(latitude: -33.732, longitude: 150.312))
  }
}
10. Shapes
The Google Maps SDK for iOS offers some simple ways to add shapes to your maps. The following shapes are supported:
- A polyline, which is a series of connected line segments that can form any shape you want and can be used to mark paths and routes on the map
- A polygon, which is an enclosed shape that can be used to mark areas on the map
- A circle, which is a geographically accurate projection of a circle on the earth’s surface
You can modify the appearance of each shape in a number of ways.
10.1 Polylines
Polylines allow you to draw lines on the map. A GMSPolyline object represents an ordered sequence of locations, displayed as a series of line segments. You can set the color of a polyline with GMSStrokeStyle.
To add a polyline:
- 1. Create a GMSMutablePath object
- 2. Set the points in the path with the addCoordinate: or addLatitude:longitude: methods
- 3. Instantiate a new GMSPolyline object using the path as an argument.
- 4. Set other properties such as strokeWidth and strokeColor as desired.
- 5. Set the map property of the GMSPolyline.
- 6. The polyline will appear on the map.
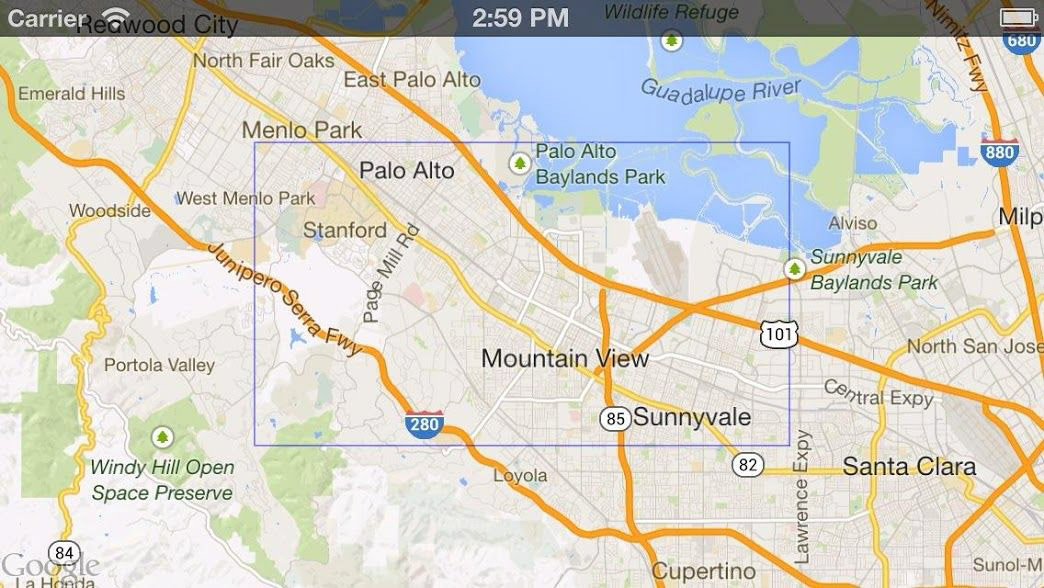
The following code snippet adds a rectangle to a map:
let path = GMSMutablePath()
path.add(CLLocationCoordinate2D(latitude: 37.36, longitude: -122.0))
path.add(CLLocationCoordinate2D(latitude: 37.45, longitude: -122.0))
path.add(CLLocationCoordinate2D(latitude: 37.45, longitude: -122.2))
path.add(CLLocationCoordinate2D(latitude: 37.36, longitude: -122.2))
path.add(CLLocationCoordinate2D(latitude: 37.36, longitude: -122.0))

let rectangle = GMSPolyline(path: path)
rectangle.map = mapView
10.2 Polygons
Polygons are similar to polylines in that they consist of a series of coordinates in an ordered sequence. However, instead of being open-ended, polygons define constrained regions. Polygons are defined in the Google Maps SDK for iOS by the GMSPolygon class.
To add a polygon:
Create a GMSMutablePath object.
Set the points in the path with the addCoordinate: or addLatitude:longitude: methods. These points will form the outline of the polygon.
Instantiate a new GMSPolygon object using the path as an argument.
Set other properties such as strokeWidth, strokeColor, and fillColor as desired.
Assign the polygon to a GMSMapView object by setting the GMSPolygon.map property.
The polygon will appear on the map.
The following code snippet adds a rectangle to a map:
// Create a rectangular path
let rect = GMSMutablePath()
rect.add(CLLocationCoordinate2D(latitude: 37.36, longitude: -122.0))
rect.add(CLLocationCoordinate2D(latitude: 37.45, longitude: -122.0))
rect.add(CLLocationCoordinate2D(latitude: 37.45, longitude: -122.2))
rect.add(CLLocationCoordinate2D(latitude: 37.36, longitude: -122.2))

// Create a polygon and assign it to the map.
let polygon = GMSPolygon(path: rect)
polygon.fillColor = UIColor(red: 0.25, green: 0, blue: 0, alpha: 0.05);
polygon.strokeColor = .black
polygon.strokeWidth = 2
polygon.map = mapView
10.3 Circles
In addition to the generic GMSPolygon class, the Google Maps SDK for iOS also includes GMSCircle, allowing you to easily draw circles on the earth’s surface.
To draw a circle, you must specify the following two properties:
-
- position as a CLLocationCoordinate2D
- radius in meters
A circle is then defined by the set of all points on the earth’s surface that are radius meters away from the given center. Because of how the Mercator projection used by the Maps API renders a sphere on a flat surface, this will appear as an almost perfect circle on the map when located near the equator and will appear increasingly non-circular (on the screen) as the circle moves away from the equator.
let circleCenter = CLLocationCoordinate2D(latitude: 37.35, longitude: -122.0)
let circ = GMSCircle(position: circleCenter, radius: 1000)

circ.fillColor = UIColor(red: 0.35, green: 0, blue: 0, alpha: 0.05)
circ.strokeColor = .red
circ.strokeWidth = 5
circ.map = mapView
11. Marker clustering
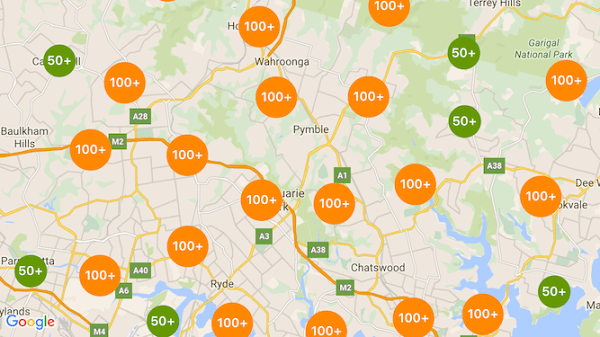
By clustering your markers, you can put a large number of markers on a map without making it hard to read. The marker clustering utility helps you manage markers at different zoom levels.
When a user views the map at a high zoom level, the individual markers show on the map. When the user zooms out, the markers gather into clusters to make the map easier to view.
To represent the markers you want to display on the map, implement the GMUClusterItem protocol in your ViewController. The following code defines a point of interest, the POIItem class, representing the markers to be managed in clusters on the map:
/// Point of Interest Item, which implements the GMUClusterItem protocol.
class POIItem: NSObject, GMUClusterItem {
  var position: CLLocationCoordinate2D
  var name: String!

  init(position: CLLocationCoordinate2D, name: String) {
    self.position = position
    self.name = name
  }
}
How to integrate Apple Maps in an iOS App
You need just a few lines of code to integrate Apple Maps into your iOS application. Apple offers MapKit, which is a native framework for mapping functionality.
Integrating MapKit
Here’s an example of the UIViewController class, which will contain MKMapView centered on London.
import UIKit
import MapKit

class ViewController: UIViewController {

    var mapView: MKMapView!
    let london = CLLocationCoordinate2DMake(51.528308, -0.3817765)

    override func viewDidLoad() {
        super.viewDidLoad()

        self.mapView = MKMapView.init()
        self.view.addSubview(self.mapView)

        self.mapView.centerCoordinate = self.london
    }

    override func viewDidLayoutSubviews() {
        super.viewDidLayoutSubviews()
        self.mapView.frame = CGRect.init(origin: CGPoint.zero, size: self.view.frame.size);
    }
}
Implementing map pins
To add a pin to MKMapView, we need to create a class that conforms to the MKAnnotation protocol. Here’s the protocol itself along with the custom annotation class:
public protocol MKAnnotation : NSObjectProtocol {
    // Center latitude and longitude of the annotation view.
    // The implementation of this property must be KVO compliant.
    public var coordinate: CLLocationCoordinate2D { get }

    // Title and subtitle for use by selection UI.
    optional public var title: String? { get }

    optional public var subtitle: String? { get }
}


import UIKit
import MapKit

class MapAnnotation: NSObject, MKAnnotation {

    //MKAnnotation protocol
    public var coordinate: CLLocationCoordinate2D
    public var title: String?
    public var subtitle: String?

    //Initializer
    init(coordinate: CLLocationCoordinate2D, title: String?, subtitle: String?) {
        self.coordinate     = coordinate
        self.title          = title
        self.subtitle       = subtitle

        super.init()
    }
}
The MapAnnotation class is now ready for use. Here’s a function for adding simple pins on a map (and the resulting UI):
func addAnnotation() {
        let annotation = MapAnnotation.init(coordinate: self.london, title: "London", subtitle: "Is the capital of Great Britain")
        self.mapView.addAnnotation(annotation)
    }
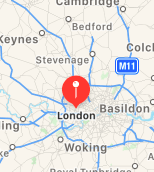
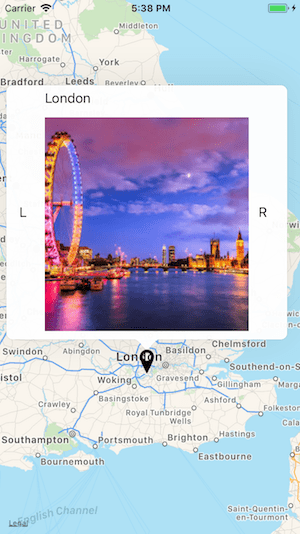
We now have the default pin on the map for our coordinates, but it’s not too interactive and doesn’t even show our title. To customize the pin UI and behavior, we’ll use the MKMapViewDelegate.
Don’t forget to set map delegate on your viewDidLoad:
self.mapView.delegate = self
We need to use only one callback for now. Map pins work pretty similarly to UITableViewCells: there can be a lot of them and they are redrawn constantly while the map is moving and zooming:
func mapView(_ mapView: MKMapView, viewFor annotation: MKAnnotation) -> MKAnnotationView? {
	//Reuse annotation view or create new one if nothing to reuse
        var view = mapView.dequeueReusableAnnotationView(withIdentifier: "MapKitTutorial")
        if (view == nil) {
            view = MKAnnotationView.init(annotation: annotation, reuseIdentifier: "MapKitTutorial")
        }

	//Set custom pin image and adjust it's size
        view!.image = UIImage.init(named: "mapPin.png")
        view!.frame = CGRect.init(origin: CGPoint.zero, size: CGSize.init(width: 30, height: 30))

	//Allow pin to show callout on tap
        view!.canShowCallout = true

        return view
    }
This delegate method will be called for each pin and allows us to customize the pin’s appearance and behavior before placed it on the map. The result of the above code is a pin with a custom image that will show a callout when tapped.
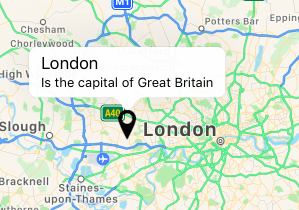
In case you need to display something more than just text, you can use a callout view.
There are three types of callouts and you can assign your custom view to any of them.
//mapView(_ mapView: viewFor annotation:) delegate
        let customCalloutCenter = UIImageView.init(frame: CGRect.init(origin: CGPoint.zero, size: CGSize.init(width: 200, height: 200)))
        customCalloutCenter.contentMode = .scaleAspectFill
        customCalloutCenter.image = UIImage.init(named: "london.jpg")
        customCalloutCenter.clipsToBounds = true
        view?.detailCalloutAccessoryView = customCalloutCenter

        let customCalloutRight = UILabel.init(frame: CGRect.init(origin: CGPoint.zero, size: CGSize.init(width: 20, height: 20)))
        customCalloutRight.text = "R"
        view?.rightCalloutAccessoryView = customCalloutRight

        let customCalloutLeft = UILabel.init(frame: CGRect.init(origin: CGPoint.zero, size: CGSize.init(width: 20, height: 20)))
        customCalloutLeft.text = "L"
        view?.leftCalloutAccessoryView = customCalloutLeft
Implementing overlays
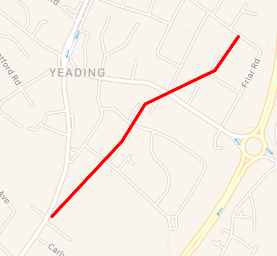
MapKit supports several types of overlays: polyline, circle, and polygon.
Drawing polylines is similar to adding pins and consists of two steps: putting the line on the map and rendering it. For rendering, we’ll use another MKMapView delegate callback:
//Create and add polyline to map
func addPolyline() {
        let polylineCoords = [CLLocationCoordinate2DMake(51.528408, -0.3917765),
                              CLLocationCoordinate2DMake(51.527508, -0.3927765),
                              CLLocationCoordinate2DMake(51.526608, -0.3957765),
                              CLLocationCoordinate2DMake(51.525608, -0.3967765),
                              CLLocationCoordinate2DMake(51.523608, -0.3997765)]
        let polyline = MKPolyline.init(coordinates: polylineCoords, count: polylineCoords.count)
        self.mapView.add(polyline)
    }


//Render polyline on map
func mapView(_ mapView: MKMapView, rendererFor overlay: MKOverlay) -> MKOverlayRenderer {
        if overlay is MKPolyline {
            let renderer = MKPolylineRenderer(overlay: overlay)
            renderer.strokeColor = UIColor.red
            renderer.lineWidth = 3
            return renderer
        }

        return MKOverlayRenderer()
    }
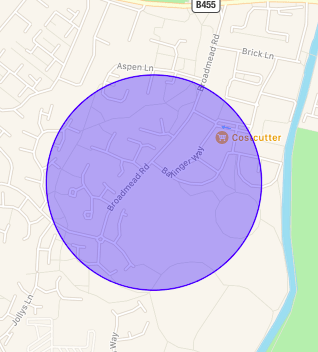
The same logic works for circle overlays:
func addCircle() {
        let circle = MKCircle.init(center: self.london, radius: 300)
        self.mapView.add(circle)
    }

    //MKMapViewDelegate
    func mapView(_ mapView: MKMapView, rendererFor overlay: MKOverlay) -> MKOverlayRenderer {
        if overlay is MKCircle {
            let renderer = MKCircleRenderer(overlay: overlay)
            renderer.fillColor = UIColor.blue.withAlphaComponent(0.3)
            renderer.strokeColor = UIColor.blue
            renderer.lineWidth = 1
            return renderer

        }

        return MKOverlayRenderer()
    }
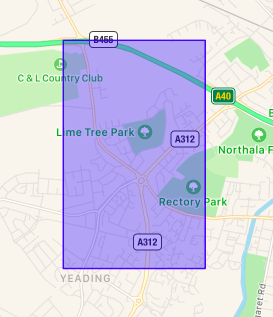
And here’s how to work with polygons:
func addPolygon() {
        let polygonCoords = [CLLocationCoordinate2DMake(51.528308, -0.3817765),
                             CLLocationCoordinate2DMake(51.548308, -0.3817765),
                             CLLocationCoordinate2DMake(51.548308, -0.4017765),
                             CLLocationCoordinate2DMake(51.528308, -0.4017765)]
        let polygon = MKPolygon.init(coordinates: polygonCoords, count: polygonCoords.count)
        self.mapView.add(polygon)
    }

    //MKMapViewDelegate
    func mapView(_ mapView: MKMapView, rendererFor overlay: MKOverlay) -> MKOverlayRenderer {
        if overlay is MKPolygon {
            let renderer = MKPolygonRenderer(overlay: overlay)
            renderer.fillColor = UIColor.blue.withAlphaComponent(0.3)
            renderer.strokeColor = UIColor.blue
            renderer.lineWidth = 1
            return renderer

        }

        return MKOverlayRenderer()
    }
Which map should you choose?
Though Google Maps and Apple Maps are similar in many ways, each is still unique. Anyone who wants to develop an iOS app with a location-based service needs to choose which mapping service to use.
Here we will provide you with a google maps for iOS review and compare it to native maps.
The main difference between Apple Maps and Google Maps is their focus. While Google Maps is focused on locations and places, Apple Maps is focused on building routes. With the Google Maps API for iOS, you can add places of interest to your map.
Google Maps is believed to be more accurate than Apple Maps – when zooming in, it shows more detail. This is the result of many years of work on Google’s part.
However, many people find that Apple Map’s design is more subtle and pleasant to look at. While Google’s unique feature is Street View, Apple has a fancy Flyover feature.
When you integrate a map into an iOS application, remember that many iOS users like to interact with Siri. Apple Maps supports Siri, allowing users to ask Siri to look for a location and give directions. Google has OK Google, but it isn’t as advanced as Siri.
If you need help choosing which mapping solution will work best for your mobile app or if you need to develop a location-based application and hire iOS developers, contact Mobindustry for a consultation. Location-based services is one of our specialties, and we would be happy to provide expertise to help you implement your idea.

