Introduction to Core Animation: Step-by-step Guide
Animation is an important part of almost every user interface, both for mobile apps and web platforms. Developers implement various animated elements to make their apps more compelling. In this article we’ll tell you how to work with Core Animation, a graphics rendering framework for iOS app development projects.
Note: This tutorial assumes you have a basic familiarity with Swift and the UIKit framework.
CALayer
By now, you should already know what a view is. Each time you work with a view, you indirectly work with a layer. So what is a layer? Every single view in the UIKit framework contains a layer. To see this, you can create your own UIView and access the layer property:
let myView = UIView()
myView.layer
* Note that by changing the color, size, and other properties for our UIView, we’re changing its underlying layer. In other words, UIView renders the animation on the screen.
The layer property in UIKit views appears to be an instance of the CALayer class. This class is presented by Core Animation framework, a lower-level abstraction of UIKit.
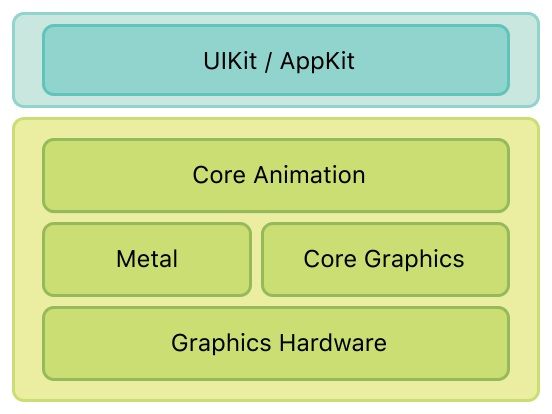
Core Animation was created to make it easier for us to work with graphics based on OpenGL. With Core Animation, you need fewer lines of code to describe any simple action. UIKit is a higher-level framework that sits above Core Animation, as we usually don’t require complex UI and animations.
This can be described by the following hierarchy:

What more is there to know about CALayers?
- A layer is a model object. It provides data properties and does not implement logic. A layer doesn’t include complex Auto Layout dependencies and doesn’t handle the user experience.
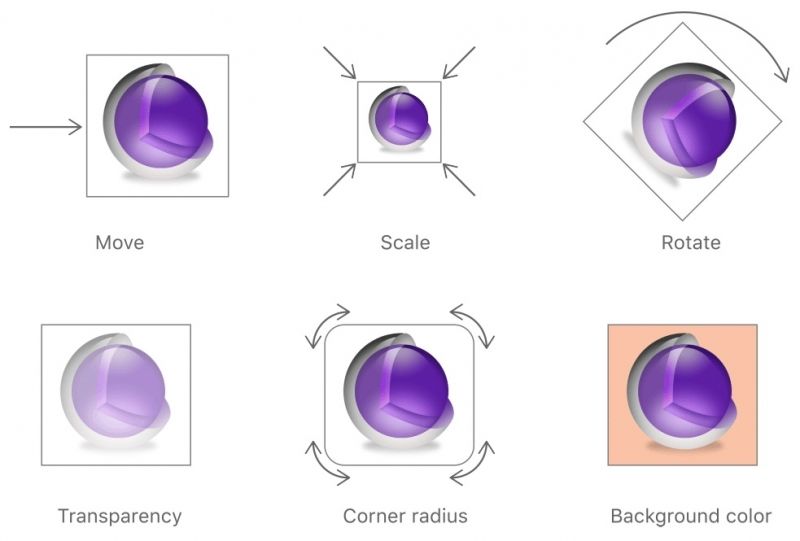
- A layer has predefined visually-oriented properties, including a series of attributes that affect how content is displayed on the screen (border lines, border color, element position, shadows, etc.).
- Core Animation optimizes caching of the layer content and enables fast drawing directly from the GPU.
Layer animation
The layer animation operates the same way as the view animation. Just animate the property between the initial and final values for a specific timespan and let Core Animation take care of the intermediate rendering. However, layers have more animated properties than do UIKit views. This gives you plenty of flexibility when developing custom effects.
Let’s create a simple animation using Core Animation:
class ViewController: UIViewController {
    var myView: UIView!

    override func viewDidLoad() {
        super.viewDidLoad()
        let frame = CGRect(origin: CGPoint.zero, size: CGSize(width: 100, height: 100))
        myView = UIView(frame: frame)
        myView.backgroundColor = .black
        view.addSubview(myView)
    }
    override func viewDidAppear(_ animated: Bool) {
        super.viewDidAppear(animated)

        let animation = CABasicAnimation(keyPath: "position.x")
        animation.fromValue = CGPoint.zero
        animation.toValue = view.bounds.size.width
        animation.duration = 0.5
        animation.beginTime = CACurrentMediaTime() + 0.3
        animation.repeatCount = 4
        animation.autoreverses = true

        myView.layer.add(animation, forKey: nil)
   }
}
In this example, we created our own UIView with the name myView using the viewDidLoad method. We set myView to move along the X axis with the viewDidAppear method. Animation objects in Core Animation are just data models. To create an animation, first create an instance of the model and set its properties accordingly. An instance of CABasicAnimation describes the animation of a potential layer. You can either run it now, later, or not launch it at all.

Let’s look closely at the properties and methods of CABasicAnimation.
1) We created an instance of the CABasicAnimation class and set it to a keyPath. The keyPath defines the purpose of our animation. For example, keyPath: “position.x” means that our animation will move left or right along the X axis, depending on the value.
CABasicAnimation(keyPath: "position.x")
In this case, keyPath describes various properties of the CALayer class. As our layer possesses different properties, we can change and animate such things as borders, fills, position along different axes, radius, and turns. In the example, we change the position along the X axis.
2) The next property shows from which position the animation starts moving along the position.x key and at what point it stops.
animation.fromValue = CGPoint.zero
animation.toValue = view.bounds.size.width
3) If you previously worked with UIView.animation(…), then you might be familiar with the duration property. Duration indicates the time during which an animation is performed. The above value shows that our layer will be shifted from the point fromValue to the point toValue along position.x in 0.5 seconds.
animation.duration = 0.5
4) The BeginTime property sets the start of the animation. The CACurrentMediaTime function shows that the animation starts at the current time value, and the value + 0.3 delays the start by 0.3 seconds. Try to change this value to 5 and restart the project. The animation then will start 5 seconds after you add it to the layer.
animation.beginTime = CACurrentMediaTime() + 0.3
5) The animation will repeat as many times as you set it to.
animation.repeatCount = 4
6) If you set autoreverses as true, the animation will perform in reverse once it gets to the end. Our myView moves along the predetermined trajectory and then goes back. The autoreverses property is in charge of this. If you comment out this line, autoreverses will be false by default. In this case, myView will move only in one direction.
animation.autoreverses = true
7) This code adds the animation to our myView layer. After you insert this code, the animation will come to life.
myView.layer.add(animation, forKey: nil)
In this example, we created a simple animation and analyzed its properties. Try to do the same using another layer’s properties by changing the key to position.y, border, backgroundColor, etc. Note that while changing the key, you should also change fromValue and toValue.
Animation delegates
A UIView animation has a closure that informs you about the end of the animation. Core Animation also has methods to notify you about the start and end of the animation. In this case, instead of a closure, we’re working with a delegate. Delegate is a property of CABasicAnimation and belongs to the CAAnimationDelegate protocol. Let’s add a line of code – animation.delegate = self – and implement both CAAnimationDelegate methods:
extension ViewController: CAAnimationDelegate {
    func animationDidStart(_ anim: CAAnimation) {
        print("animation did start")
    }

    func animationDidStop(_ anim: CAAnimation, finished flag: Bool) {
        print("animation did finish")
    }
}
As we can see, the animationDidStart method informs us about the start of the animation, and the animationDidStop method tells us that the animation has finished.
Spring animation
Now that we’ve reviewed CABasicAnimation, we can move to CASpringAnimation, which is the successor to CABasicAnimation.
CASpringAnimation allows developers to create an animation effect that imitates a spring motion. Let’s replace our code in the viewDidLoad method with the code provided below to see the new properties of CASpringAnimation.
        let jump = CASpringAnimation(keyPath: "transform.scale")
        jump.damping = 10
        jump.mass = 1
        jump.initialVelocity = 100
        jump.stiffness = 1500.0

        jump.fromValue = 1.0
        jump.toValue = 2.0
        jump.duration = jump.settlingDuration
        myView.layer.add(jump, forKey: nil)
This gives us a spring-based animation. By changing keyPath to transform.scale, we set scale as a new key that will change the size of myView from 1.0 to 2.0.
You can also see the following new parameters:
damping – used to compute the damping ratio
mass – the effective mass of the animated property; must be greater than 0
stiffness – the spring stiffness coefficient. Higher values correspond to a stiffer spring that yields a greater amount of force for moving objects.
initialVelocity – the initial impulse applied to the weight
jump.settlingDuration – this value sets the animation duration.
CAShapeLayer, CGPath, and UIBezierPath
CAShapeLayer is a CALayer subclass used to draw various shapes (simple and complex).
CGPath is a mathematical description of shapes and lines that should be drawn in a graphics context.
UIBezierPath is a path that consists of straight and curved line segments that you can render in your custom views.
With the help of UIBezierPath, you can draw any shape or line segment. This class has different rendering methods: circle, semicircle, square, and so on. You can also create new shapes by adding lines and curves from point A to point B.
UIBezierPath includes the CGPath property, which is responsible for the mathematical description of the shape. CGPath doesn’t provide rendering methods for shapes; therefore, we’ll render the shape with UIBezierPath and assign its property to CAShapeLayer. This way the shape we create will appear on the screen.
To see how this works, let’s create a new ViewController and add the shapeLayer to our view. Now we’ll draw a drop-like shape in the middle of the screen with UIBezierPath.
class ViewController: UIViewController {

    var shapeLayer: CAShapeLayer!

    override func viewDidLoad() {
        super.viewDidLoad()

        let shapeLayer = CAShapeLayer()
        view.layer.addSublayer(shapeLayer)

        self.shapeLayer = shapeLayer
    }

    override func viewDidAppear(_ animated: Bool) {
        super.viewDidAppear(animated)

        let path = UIBezierPath()
        path.move(to: view.center)
        path.addCurve(to: view.center,
                      controlPoint1: CGPoint(x: view.center.x + 150, y: view.center.y + 150),
                      controlPoint2: CGPoint(x: view.center.x - 150, y: view.center.y + 150))

        path.lineWidth = 2

        shapeLayer.fillColor = UIColor.clear.cgColor
        shapeLayer.strokeColor = UIColor.blue.cgColor
        shapeLayer.path = path.cgPath
    }
}
Using UIBezierPath, we’ve created a mathematical description of the drop-like shape and assigned our path to CAShapeLayer for it to render.
Note the key properties responsible for describing the shape:
1) The first thing we do is describe the starting point for rendering the shape. In this case, it’s the center of the screen.
path.move(to: view.center)
2) The addCurve method allows us to add a circle. The first property describes the ending point of the circle. In this example, the circle appears to be closed, as its starting point and ending point are the same. Properties such as controlPoint1 and controlPoint2 describe the points along which the circle will be drawn. To attain a drop affect, we’ve set certain margins, which you can see above as a CGPoint.
path.addCurve(to: view.center,
           controlPoint1: CGPoint(x: view.center.x + 150, y: view.center.y + 150),
           controlPoint2: CGPoint(x: view.center.x - 150, y: view.center.y + 150))
Creating a pull-to-refresh gesture with Core Animation
Pull-to-refresh (or swipe-to-refresh) is a gesture that lets a user pull down on a list in order to retrieve more data.
Note: This tutorial assumes that you’ve already worked with UIPanGestureRecognizer. If you aren’t familiar with this class, you can learn more here.
class ViewController: UIViewController {

    @IBOutlet weak var activityIndicator: UIActivityIndicatorView!

    let shapeLayer = CAShapeLayer()

    override func viewDidLoad() {
        super.viewDidLoad()

        activityIndicator.isHidden = true

        let gestureRecognizer = UIPanGestureRecognizer(target: self, action: #selector(gestureAction))
        view.addGestureRecognizer(gestureRecognizer)
        view.layer.addSublayer(shapeLayer)
    }

    override func viewDidAppear(_ animated: Bool) {
        super.viewDidAppear(animated)

        shapeLayer.fillColor = UIColor.black.cgColor
        shapeLayer.path = createPath(point: CGPoint(x: view.bounds.maxX / 2, y: view.bounds.minY))
    }

    @objc func gestureAction(_ sender: UIPanGestureRecognizer) {
        let point = sender.location(in: view)

        struct AnimationSetting {
            static var isAnimation = false
            static var isLoading = false
        }

        switch sender.state {
        case .began:
           AnimationSetting.isAnimation = point.y < 40 if AnimationSetting.isAnimation { shapeLayer.removeAllAnimations() } case .changed: guard AnimationSetting.isAnimation else { return } shapeLayer.path = createPath(point: point) case .ended, .failed, .cancelled: guard AnimationSetting.isAnimation else { return } animationStartingPosition(fromPoint: point) default: break } } func createPath(point: CGPoint) -> CGPath {
        let bezierPath = UIBezierPath()

        let startPoint = CGPoint(x: 0, y: 0)
        let endPoint = CGPoint(x: view.bounds.maxX, y: view.bounds.minY)
        bezierPath.move(to: startPoint)
        bezierPath.addCurve(to: endPoint, controlPoint1: point, controlPoint2: point)
        bezierPath.close()

        return bezierPath.cgPath
    }

    func animationStartingPosition(fromPoint: CGPoint) {
        let animation = CASpringAnimation(keyPath: "path")
        animation.fromValue = createPath(point: fromPoint)
        animation.toValue = createPath(point: CGPoint(x: view.bounds.maxX / 2, y: view.bounds.minY))

        animation.damping = 10
        animation.initialVelocity = 20.0
        animation.mass = 2.0
        animation.stiffness = 1000.0

        animation.duration = animation.settlingDuration

        animation.delegate = self
        shapeLayer.add(animation, forKey: nil)

        shapeLayer.path = createPath(point: CGPoint(x: view.bounds.maxX / 2, y: view.bounds.minY))
    }
}


//MARK: - CAAnimationDelegate

extension ViewController: CAAnimationDelegate {
    func animationDidStart(_ anim: CAAnimation) {
        activityIndicator.isHidden = false
        activityIndicator.startAnimating()
    }

    func animationDidStop(_ anim: CAAnimation, finished flag: Bool) {
        shapeLayer.removeAllAnimations()

        activityIndicator.isHidden = true
        activityIndicator.stopAnimating()

    }
}
Example of pull-to-refresh animation:

Conclusion
In this tutorial, you’ve learned how to create your own animation with low-level access using Core Animation classes in iOS app development projects. You also became familiar with layers and their key properties. Now you can render an animated shape using the path key to add an effect to your project’s UI.

