How to Implement the BLoC Architecture in Flutter: Benefits and Best Practices
Flutter is a relatively new technology that’s becoming more popular by the day. But because it’s still young, developers have many questions about it. In this article, we’ll answer common questions about the best Flutter architecture, how to implement it, and how to use it in real-world projects
What is BLoC?
Flutter BLoC pattern (Business Logic Component) is an architectural pattern based on separate components (BLoC components). BLoC components contain only business logic, which can easily be shared between different Dart apps. This architecture was introduced by Google at Google I/O 2019. Currently, the BLoC architecture is the most popular Flutter architecture.
Why BLoC?
BLoC makes it easy to separate the presentation layer from the business logic, making your code fast, easy to test, and reusable. As a Flutter developer, I want to:
- know what state my application is in at any point in time
- easily test each case to make sure my app is responding appropriately
- record every single user interaction in my application so I can make data-driven decisions
- work as efficiently as possible and reuse Flutter components both within my application and across apps
- have many developers seamlessly working within a single code base, following the same patterns and conventions
- develop fast and reactive apps
There are many Flutter app architectures to choose from, but deciding which one to use can be daunting, as no architecture can ever fulfill all your needs. BLoC, which was specifically developed for Flutter, is the closest to perfection for the Flutter framework, as it’s built around three core values:
- Simplicity
- Testability
- Power
BloC allows easier management for stateful widgets. Usually what developers do is use setState several times. This initiates rebuilds and causes performance issues. BloC, however, defines business logic differently by using bloc classes. This prevents multiple rebuilds and ensures better performance.
The testability of the apps built with BloC architecture is better because of the separation between the logic and widgets themselves. Due to this, code also becomes more reusable, as you can apply the same logic in multiple places instead of having to develop it again.
BLoC is rather simple and elegant, which makes it easy to understand for both junior and experienced developers that provide Flutter app development services.
The ability to create complex applications out of smaller components is what makes the BLoC architecture powerful. And while these small components are discrete, it’s also easy to test any aspect of an application.
BLoC attempts to make state changes predictable by regulating when a state change can occur and enforcing a single way to change state throughout an entire application.
How does the BLoC architecture work?
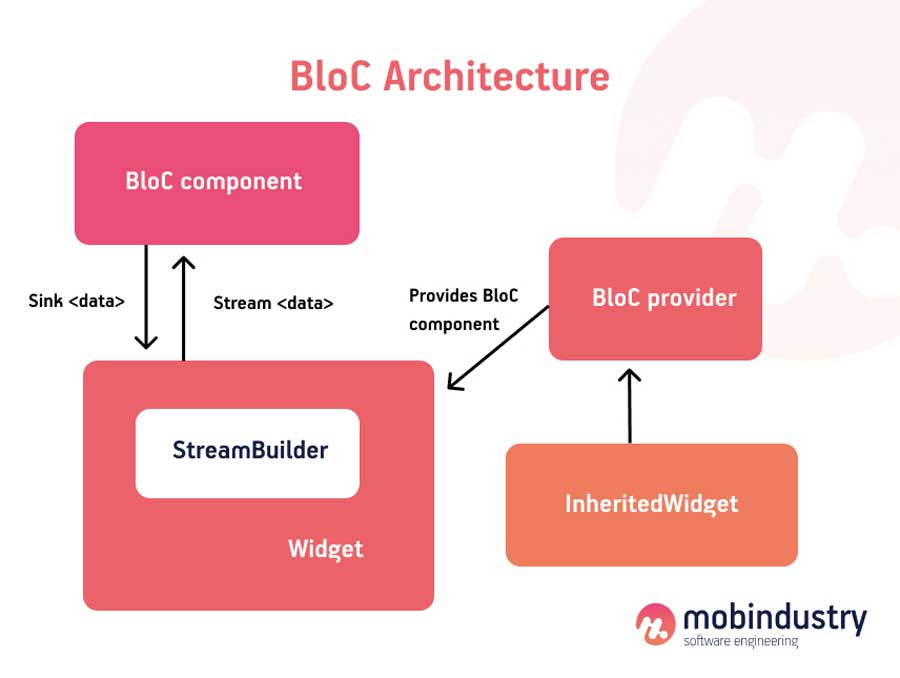
This simple diagram demonstrates how the BLoC architecture works.

When a user clicks and interacts with the UI, they send an action or an event to the BLoC component. The main responsibility of the BLoC component is to interpret the action, handle it, and return a new or updated state to the UI component.
The BLoC component has to do all work related to the business logic (i.e. fetch data from the internet and process it). After it does this, it has to send the state to the UI component, which is responsible for handling the state component and showing it appropriately.
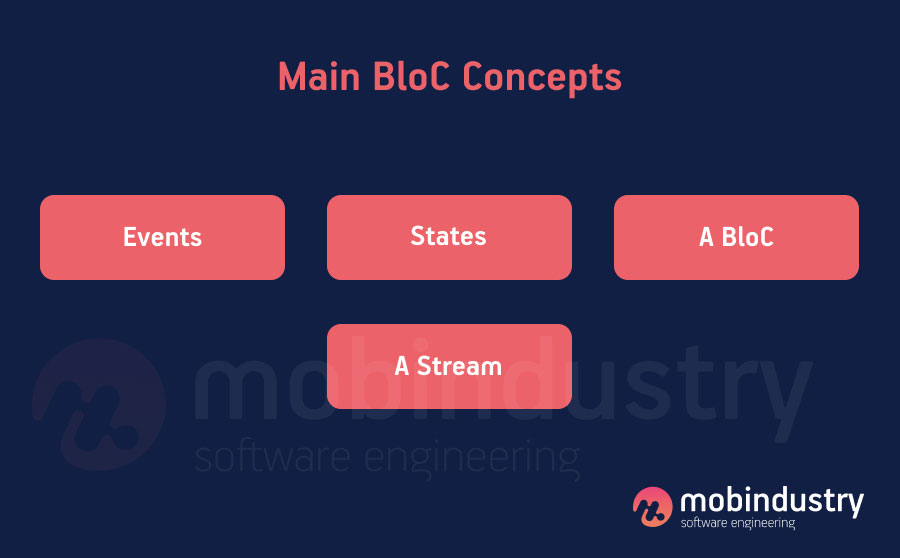
Main BLoC concepts
Events and actions are the inputs of the BLoC architecture. They’re commonly created in response to user interactions with an interface, such as button presses or lifecycle events like page loads. When designing an app, we need to step back and define how users will interact with it.
States are the outputs of the BLoC architecture, and they represent part of your app’s common state. UI components can be notified of states and redraw portions of themselves based on the current state.

A BLoC (Business Logic Component) converts a stream of incoming events into a stream of outgoing states. Think of a BLoC as the “brain” that receives information, processes it and provides a response.
You might notice in the diagram above that transferring between BLoC and state components (as well as between state and UI components) happens thanks to streams.
A stream is a sequence of asynchronous data. The UI and BLoC listen to this stream and respond to any changes. Check out the official Dart documentation for more information about streams.
When to use the BLoC pattern
So when should you use the BloC architecture? Because the BloC pattern is the most popular architecture for Flutter apps, most developers will always choose it for their Flutter projects, because Flutter is widget-based, and the BloC architecture allows your widgets to communicate with other layers of the application.
These are the conditions when you should consider using the BloC architecture:
- You need to connect your widget to the data layer and make it communicate with a service, API or a repository
- You need to separate a widget from its logic, because the management became too complex
- You want your widget to be completely separate from the business logic
- You’d like to implement automated testing for your widget’s logic
- You started a complex project that needs to be scalable and maintainable
Best way to use the BLoC architecture
There are two approaches when it comes to developing mobile apps on Flutter and, in particular, developing their architecture: you can either do everything from scratch or use a ready solution.
If you develop your Flutter app’s architecture from scratch, you’ll need to create custom code and streams. This takes time, and in the long run can lead to boilerplate or spaghetti code. This will make your application hard to maintain.
Google’s Bloc library is one of the best solutions you can use for your Flutter project’s architecture.
Adding the Google Bloc library to your project
To use the Google Bloc library, add the flutter_bloc: ^2.0.1 dependency to your pub spec.yaml file. This Flutter package helps to implement the BLoC pattern in your project.
Widgets in the Flutter Bloc library
Bloc
To use the Bloc component, you have to extend the Bloc class and override the mapEventToState and initialState methods, which are responsible for initiating the first state of the UI component.
In the mapEventToState method, you’ll receive your specified actions as an argument, handle that argument, and return it as a state. Let’s see a standard example in which our Bloc, which is responsible for incrementing or decrementing the value, depends on the input action.
enum CounterEvent { increment, decrement }
class CounterBloc extends Bloc<counterevent, int=""> {
@override int get initialState => 0;
@override Stream mapEventToState(CounterEvent event) async* {
switch (event) {
case CounterEvent.decrement:
yield state - 1; break; case CounterEvent.increment:
yield state + 1; break; } } }
</counterevent,>
In the Bloc component, we implement all the business logic we need
In the example above, we receive a CounterEvent from the UI and handle it according to the event type. After that, we return the state immediately. In our case, the state is an int. In the Bloc component, we implement all the business logic we need. We also can create an abstract state and extend it to customize our responses. The same works for events.
//Customised state @immutable abstract class IncomingState {}
class InitialIncomingState extends IncomingState {}
class HandledState extends IncomingState {
final int counter;
HandledState(this.counter); }@immutable abstract class IncomingEvent {}
class IncrementEvent extends IncomingEvent {
IncrementEvent(); }class DecrementEvent extends IncomingEvent {
DecrementEvent(); }
BlocBuilder
BlocBuilder is a Flutter widget that requires a Bloc and a builder function. BlocBuilder builds widgets in response to new states. It’s very similar to StreamBuilder, but it has a simpler API that helps to reduce the amount of boilerplate code in your app.
The builder function can potentially be called many times and should be a pure function that returns a widget in response to the state.
Note that you should specify the bloc if you want to provide a bloc that will be scoped to a single widget and won’t be accessible via the parent BlocProvider and the current BuildContext:
BlocBuilder<bloca, blocastate="">(
bloc: blocA, // provide the local bloc instance builder: (context, state) {
// return widget here based on the state of BlocA} )
</bloca,>
In this example, BlocA is a type of an extended Bloc class that you need to provide in the bloc argument. In the builder, you’ll receive instances of your state classes. As I mentioned above, the first state will be the state that was created in the initialState method.
Important: Don’t create an instance of the Bloc class when you create the BlocBuilder class, as you need to close streams in the Bloc class to avoid memory leaks. The best way to do this is to create a Bloc instance in the initState method and close it using blocA.close() in the dispose method.
BlocProvider
BlocProvider is a Flutter widget that provides a bloc to its children via BlocProvider.of(context). It’s used as a dependency injection widget so that a single instance of a bloc can be provided to multiple widgets within a subtree.
In most cases, BlocProvider should be used to build new blocs that will then be available to the rest of the subtree. In this case, since BlocProvider is responsible for creating the bloc, it will automatically close it as well.
BlocProvider(
builder: (BuildContext context) => BlocA(), child: ChildA(), );
Sometimes, BlocProvider can be used to provide an existing bloc with a new portion of the widget tree. This capability of the BlocProvider is usually used when an existing bloc needs to be available for a new route. In this case, BlocProvider will not automatically close the bloc, since it didn’t create it.
Creating events in the Bloc library
If you want to do something with your data — for example, save it to the database, handle it, or send it over the internet — you need to send an event to the Bloc component. Doing so is rather simple: just call the bloc’s add method.
bloc.add(YourEvent());
After you do this, your Bloc component will receive your event and handle it appropriately.
This is pretty much all you need to know to successfully use the BLoC architecture for your Flutter app using Google’s Bloc library.
Final thoughts
There are lots of ways to develop applications for Android and iOS with Flutter. You can use well-known architectures such as MVC or MVVM. However, because Flutter is somewhat different from other programming languages and it’s widget-centric, BLoC is commonly considered the best Flutter architecture.
To make your development process more effective, use ready solutions for your architecture — for example, the Google Bloc library
The BLoC architecture is a flexible pattern that’s easy to maintain. This architecture allows you to develop an app reactively with the help of streams and sinks, so I’d suggest it for any Flutter project.
To make your development process more effective, use ready solutions for your architecture — for example, the Google Bloc library. It will help you set up your architecture fast and allow you to avoid spaghetti and boilerplate code in the future.
If you have any questions about developing cost-effective mobile apps for Android and iOS using Flutter, don’t hesitate to contact Mobindustry for a consultation.
Frequently Asked Questions
BloC architecture allows developers to:
- know what state their application is in at any point in time
- easily test each case to make sure the app is responding appropriately
- record every single user interaction in the application so they can make data-driven decisions
- work as efficiently as possible and reuse components both within the application and across apps
- have many developers seamlessly working within a single code base, following the same patterns and conventions
- develop fast and reactive apps

